I built a charcoal BBQ some years ago and I hate how long it takes to fire up. I looked at new gas grills and thought I could just make one myself for a lot less. Here is the basics of how to convert one yourself. This could be applied to any charcoal grill, with a round fire ring a Webber could be converted as well. BBQ conversion to Gas – More DIY How To Projects
Once you have a truck like this you start to wish you had just a bit more space. I kept looking at all that space on top of the cab waisted to air and thought i’d be a great place for things like bikes, barrels, 10 more crew, a tent trailer less the wheels, a lawn chair and a beer, or another art car. So Hino and I set out to make a roof rack. 6.5′ x 7.5! It’s bigger than a full size truck bed. Ladders on the sides. Next mods to the truck will be a jib crane on the back and a platform on the top of the box. A kitchen box off the bottom and a awning would be nice as well.
Posted Under: How To
This post was written by Form & Reform on July 20, 2010 Comments (1)
Who needs farm show when I have friends like Fritz Hagist. Here is a true pyro solution to pesky weeds! Note that the propane line enters the combustion chamber for a pre-heat before the burners.
Jon,
I have weed whipped all the weeds in the gravel around the shop and they came back. NO MORE as the we’d-b-gon will vitrify the earth to prevent any seeds from germinating. I have been wanting to build this for years but was perturbed as I did not want to have a electric blower on board, so with a # 60 drilled orifice the liquid propane turns to 100 deg. F. vapor @ 80 + PSI…… It ROARS!
Update today
And aren’t those rear tires fab!!!
It is slower than I thought, 3 passes although the ground is real wet. I might need to shorten the vapor tube as my vapor temp at the first jet was over 500 f. but I might have been real low on liquid. So tomorrow I will check again with full tank. With 3 # 60 jets, I can get 1 1/2 hours of burn on 7 gallons of fuel. So I really do not want to open them up to a 55 or so. I think if the fuel was much cooler it would be much denser and hence more BTU’s in the box. I tried subbing 10% gas-90% #2 diesel after the unit was well preheated and I got yellow flames and smoke….
Posted Under: Friends,How To
This post was written by Form & Reform on May 26, 2010 Comments Off on We’d-Be-Gon
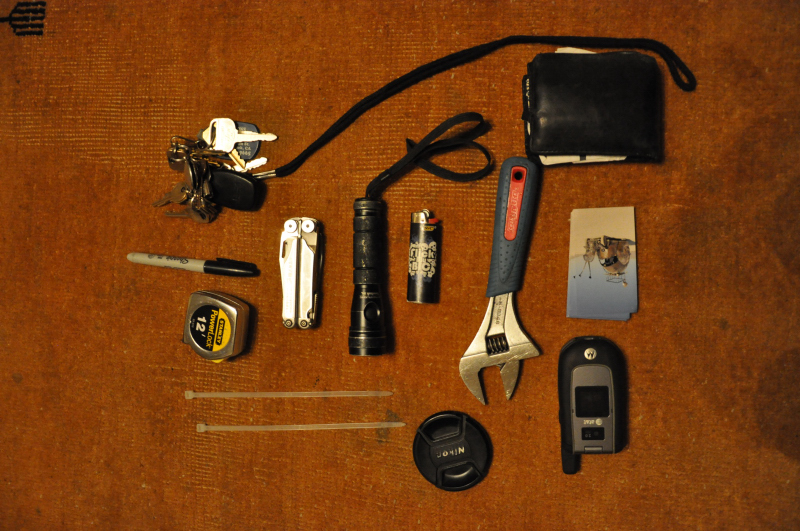
While searching the web for pictures of the Electric Daisy Carnival I came across these pictures in surprising quantity. It got me thinking about what I carry in my pockets every day. This is a light day, no change, and I had to use the camera to shoot the picture. Every once in a while I get called out on how many items I have on my belt. Try Google and you will see what I mean.
My pockets
I like the chainmaille supplies in this one, just in case!
Office guy.
Next week I’ll do one on what I carry in my truck at all times. Skin stapler is a must!
Posted Under: How To
This post was written by Form & Reform on May 12, 2010 Comments (3)
So many people that have hung out with the warmth and played in the sand of my wonderful Fire Gardens have asked me how they could make one of their own. Well I’ve taken the guess work out of all the fittings and sizes and put together a few kits that I use all the time in my work.
Available Kits:
FR12SLP 12″ steel fire ring with low pressure regulator
This is a great set up for 14-22″ sand gardens.
Contains:
12″ steel fire ring, weldable 1/2 coupler, 3/8″ 45 deg to 1/2 NPT fitting (to connect to the gas hose), 1/2 x 2″ brass nipple, Teflon tape, and a low pressure 1/4 FPT regulator with needle valve.
FR12SHP 12″ steel fire ring with a 0-60 psi regulator and a venturi mixer
This is a great setup for 14-22″ sand gardens, rocks, high temp glass, or other porous materials etc that need a venturi (gas air mixer) to achieve a clean soot free burn.
12″ steel fire ring, weldable 1/2 coupler, 3/8″ 45 deg to 1/2 NPT fitting (to connect to the gas hose), 2pc 1/2 x 2″ brass nipples, gas orifice (.0250), Teflon tape, and a high pressure 0-60 psi regulator.
$150.00 plus tax and shipping
Examples of Fire Gardens and Patio Heaters (Replaced the fire ring with unique burners) made with this setup
Upgrades to above kits:
18″steel fire ring $22 (good for 24-30″ sand gardens)
12″ stainless steel fire ring $60 (Stainless will last longer and the small gas hole won’t rust shut if you leave in the rain)
18″ stainless steel fire ring $90 FR18SSLP $185
In addition to these kits you will need a container that isable to handle high temperatures and be fully sealed underneath (leaks or drain holes will also allow gas out). A 55 gal drum works good. The weldable coupler provided will need to be welded though the bottom, legs added, then simply attach the fittings, ring, hose, propane BBQ tank and add sand. Sand should be 3-4″ above the ring. This is a match light system and I like those plumbing torches to light mine. Light the torch, then turn on the gas with the flame above the sand. It will take several seconds for the sand to fill with gas and rise to the top. Once lit it’s time to play in the sand with simple tools. This works best after dark when you can turn the flame down very low tell you only see a blue flame.
Fire is hot! DO NOT TOUCH the sand. It’s sticks and will burn before you can get it off. I would add a safety rail to keep young ones from falling on the hot edge and in the sand. It’s also a great place to keep your tools and rest your feet. 30″ is a great height to stand next to, and 14-18″ is great to sit around. Provide a minimum of 6″ below the coupler on the bottom for the fittings and hose. Keep your sand dry by covering in the rain.
Contact me at 510 444 7007, or email me at books@formandreform.com
Click on the above link to get to our car on Instructables, look for the VOTE NOW button above step 7 & 8 on our instructable page. You will be asked to sign up if you have never been on their site before (not a long process and we promise to make more wonderful things with the tools!)
We are now in 2nd place in the popular vote. Keep the votes coming we are not far behind first place.
Voting ends this Sunday. Don’t forget to rate us as well. There is some great stuff to vote for!
Thanks to all of you who have voted for us!
—————————————————————————————————
Voting is over and we are Finalists!
This means we now move onto the next round where Instructables judges will pick the top 15, those teams will then be judged by Sears to see who gets the grand prize. The whole process will be over by the end of Jan. I’ll post more as I find out.
Posted Under: How To,Snail Art Car the Golden Mean
This post was written by Form & Reform on January 5, 2009 Comments Off on Instructable for the Golden Mean
The rains a few weeks ago came at just the right time for our last fig crop of the year making them nice and plump. Conveniently the biggest branch, well out of reach and covered with figs, snapped in the rain giving us figs galore right at our feet! Zolie and I picked them and cut firewood Sunday and started making Jam early Monday morning. After getting things started, Zolie got Kyrsten up to speed so I could get to work. While I was gone the two of them reduced the mix down to very nice jam, canned it and even made beautiful labels. We tried out the new fig jam this morning on pancakes with the homemade butter we made a few weeks back. Yum! Apple butter is next!
Zolie’s Fig Jam
Boiling water (enough to cover figs completely)
4 qts fresh figs (8 cups crushed)
2 cups Sugar
3 cups water
8 slices lemon
Pour boiling water over figs; let stand 15 minutes. Drain and thoroughly rinse in cold water. Pat dry; remove stems. Crush and measure figs; place in large heavy pot. Add 1/4 cup sugar for each cup of crushed figs. Add 3 cups water. Bring to a rapid boil; reduce heat and simmer, uncovered, 3 hours or until thickened, stirring occasionally.Ladle hot jam into hot sterilized jars, leaving 1/4-inch headspace; add a slice of lemon to each jar. Cover at once with metal lids and screw on bands finger tight. Process in a boiling-water bath for 10 minutes. Yield: 8, 1/2 pints.
My daughter Zolie and I thought it would be fun to make butter to go with Mom’s pancakes. My local homeless friend Hank found this great Daisy Churn #4 for me a few weeks back. With the leftover cream from the birthday pies we made last week and a copy of Joy of Cooking from 1964 we got to work. Right away we knew we were in for the long haul when we read “how much slower the process was in threatening or stormy weather”. We looked outside and saw it was still raining. We worked the handle on top of the table, then on the floor and finally we moved out to the living room to catch a movie while we finished. Finally we had what looked like butter. After removing it from the churn and washing with cold water we had to decide what kind of salt to add. We split it up and added French British Maldon sea salt to half and Korean parched salt to the other. The whole time we made it Zolie kept telling me to go slower dad. How she knew that I have no idea. I kept asking her where she lived last and who she was. Old souls make great butter even in the rain!
cranking hard on the table
It’s thicker now and she had to move it to the floor for better leverage.
Home made butter on Kyrsten’s buckwheat pancakes!
Update
The butter tastes great and the little bit of Buttermilk left in pockets of the butter makes it moist on toast.
Buttermilk will get used this Sat. for more Pancakes and fresh butter!


